
Regardless of the type of business, if you have a website, Google Tag Manager must be a part of it. This free tool from Google allows you to add multiple scripts (snippets) to your site.
All you need to do is add one script to your website, and Google Tag Manager will automatically fire all other necessary scripts.
If you are confused, you are not alone
Let me explain.
What is Google Tag Manager?
Let’s say you are using Google Analytics, Google Ads, and Facebook ads to attract traffic on your website. You need to track these visitors and conversions, and for that, you need to install code snippets from all three services.
With Google Tag Manager, you can add all three scripts into this system whenever you want. You can easily enable disable or remove these scripts as per your need.
Google Tag Manager is a platform with in-built tags for Google Ads, Facebook Ads, Google Analytics, and more. It saves you a lot of time by managing all the code snippets from a single platform.
And if you are using any third-party service and want to install code snippet for them, it also offers you the option of adding an HTML code.
In this blog, I am going to guide you on how to create and install Google Tag Manager on a WordPress website.
Please note: This guide is for WordPress website users. However, you can use the same tactic to add Google Tag Manager to your static HTML site or any other CMS. Those platforms may have a different way to add the code.
Let’s get started.
Setup Google Tag Manager
Go to Google Tag Manager and signup or open your existing account.
If you are not logged in to your Google Account, it will ask you to log in, or you’ll be redirected to the Tag Manager account to create an account if you are already logged in.
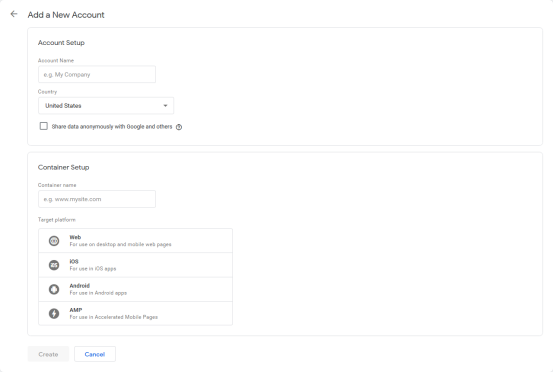
Once you are there, the system will ask for an account name and country in the first section. Enter your company name as the account name and your region.
In the section two, you’ll be asked for a Container Name and Target Platform. Enter your website name or URL as a container name and select web as you’ll be using it on your WordPress website.
Next, you will have to accept the Terms of Service.
Checkmark the box “I also accept the Data Processing Terms as required by GDPR.” at the bottom and click the yes button on the top right corner.

Once you accept the terms, the system will give you a code snippet.
As per the instruction, you will need to keep 2 codes on your website.
- First GTM code- You need to keep it in the head tag as high as possible.
- Second GTM code- You need to place it right after the body tag in your HTML.

As I mentioned earlier, if you have a static HTML site, you can follow this instruction.
And, we are going to do it the easy way because WordPress is all about simplifying things.
Next, click on the OK button and continue to the GTM dashboard. You will see the code (GTM-XXXX) on the top right corner like the below screenshot.

Copy the code and keep it with you. We will further integrate it into your WordPress site.
Add Google Analytics in Google Tag Manager
Now, in your Google Tag Manager account, you don’t have any code snippet. I will add Google Analytics as an example to give you an idea on how to add and publish the snippets.
You will need a Tracking ID from your Google Analytics to add to the Google Tag Manager.
Go to your Google Analytics account > Admin > Property > Tracking Info.
Click on the Tracking Code to get the tracking ID.
Tracking ID would be something like UA-XXXXXXX
Copy it.
Now again go to the Google Tag Manager.
Click on “Add New Tag” from your dashboard
or go to the Tags menu > Click “New” button on the top right corner.
It will open a popup to configure the Google Analytics Tag.
Name your tag “Google Analytics”
Click on tag Configuration > Select “Google Analytics: Universal Analytics”
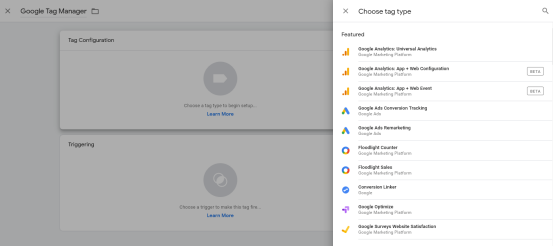
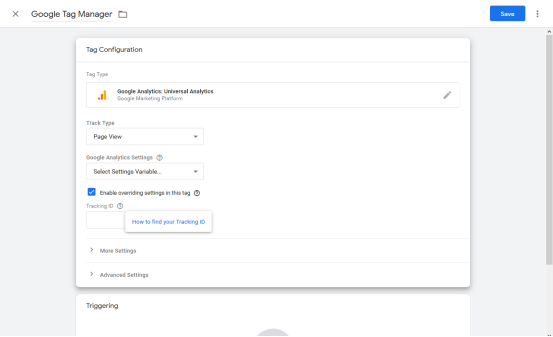
Once you select it, it will show you options like the below screenshot.
You will have to Check Mark “Enable overriding settings in this tag” and add Tracking ID in the text box which will appear after selecting the option.
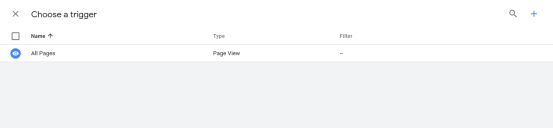
Next, you’ll need to click on the triggering option, and it will open the popup. Choose “All Pages” to track all the pages in Google Analytics.
Post that, click on the Save button on the top right corner.
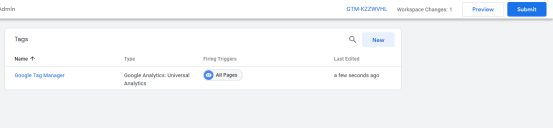
You have now successfully added the Google Analytics Tag into your Google Tag Manager.
Now that you have a tag, you need to publish the container.
Click on Submit button on the top right corner.
After submitting, you will see Submit changes popup like the below screenshot..
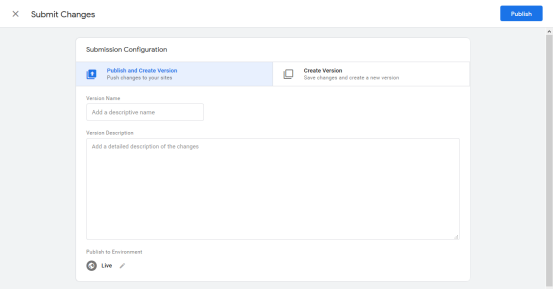
Enter Version Name and Description and click on the Publish button on the top right corner.
Your Google Tag Manager account is live.
Add Google Tag Manager code to WordPress website
After publishing Google Tag Manager, it’s now time to add the GTM code snippet to your WordPress website.
First, you will need to add a plugin that allows you to add the tag manager code.
Go to Plugin > Add New and search for “Google Tag Manager for WordPress”
You will see the first plugin with the same name.

Click on “Install” to install the plugin and once installed, click on “Activate” to activate it.
Next, go to “Settings” > “Google Tag Manager”

Get the Google Tag Manager ID that I asked you to save in the earlier step. GTM ID would be something like “GTM-XXXXX”
Add your GTM ID and select “Custom” option.

For the next step, you will need to tweak your template a little. This is a onetime process that we must do as we don’t want to install it in the footer, nor do we want to try the experimental method as mentioned in other options.
To tweak the template, copy in the light red background as shown in the screenshot below.

Next, go to “Appearance” > “Theme Editor”. Click “I understand” if it opens the popup for warning.
Click CTRL + F > Search for “theme header”

Click on Theme Header option to open the header.php file.
Find the “body” tag in the code and paste the line below the body tag as shown in the below screenshot.

Once done, click on the Update File button, and you are done.
You have successfully installed it.
Now, let’s verify it.
Verify Google Tag Manager Installation
Install the Google Tag Assistance Chrome Extension. This tool will help you see whether your tags are firing on the website page load or not.

Click on “Add to Chrome” and select “Add Extension” to install.
Once installed, click on the Tag Manager icon as per below screenshot and click on the “Done” button.
Leave all settings as.

Once you click done, you will get the option to enable the Tag Assistance. Click on the “Enable” button to activate.

Reload the page, and now you can see the tag manager is working.
To test the website, open the website and click on the Tag Manager icon in your browser. It will open the window showing the Tags fired on the website page load.
That’s it.
This is how you can install Google Tag Manager to your WordPress site. All the major processes are a one-time process, and whenever you need to add or remove tags or code snippet on the website, you can easily access, and update them. You can easily manage all your code snippets using Google Tag Manager.
I hope this small tutorial has helped you understand Google Tag Manager a little more.
If you have any queries, feel free to leave a comment and I assure you, I will answer them to the best of my abilities.
1 thought on “How to Install Google Tag Manager on WordPress website?”